how to remove circuit breaker from panel box?
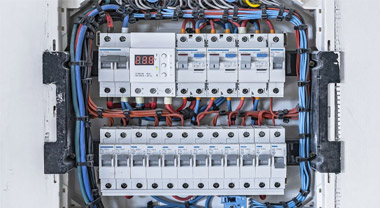
Electricity is a vital part of our daily lives, and understanding the basics of your home's electrical system can save you time, money, and ensure safety. This guide will walk you through the process of safely removing a circuit breaker from a panel box. It's a task that may seem daunting, but with careful preparation and a step-by-step approach, it can be manageable.
Table of Contents
- What is a Circuit Breaker?
- Why You Might Need to Remove a Circuit Breaker?
- Safety First: Precautions Before You Begin
- Tools Needed to Remove a Circuit Breaker
- Step-By-Step Guide to Removing a Circuit Breaker
- When to Call a Professional
- Summary
What is a Circuit Breaker?
A circuit breaker is a critical component of any home's electrical system. It's designed to protect the circuits from damage caused by overload or short circuit. When it detects an electrical fault, it automatically interrupts the current flow, "tripping" to prevent potential damage.
Why You Might Need to Remove a Circuit Breaker?
There could be several reasons why you might need to remove a circuit breaker from the panel box:
- Replacement: If a breaker is old, faulty, or keeps tripping, it may need to be replaced.
- Upgrading: You may want to upgrade your electrical panel to accommodate more circuits or to handle more power.
- Maintenance: Occasionally, breakers may need to be removed for general electrical maintenance or panel cleaning.
Safety First: Precautions Before You Begin
Before diving into the removal process, it's critical to emphasize safety. Dealing with electricity can be dangerous if not handled correctly. Here are some precautions to take:
- Turn Off the Main Power: Always switch off the main power to your home at the main electrical panel before starting.
- Use Insulated Tools: Always use tools with insulated handles.
- Wear Protective Gear: Consider wearing rubber-soled shoes, safety goggles, and gloves for additional protection.
- Check for Residual Current: Even after turning off the main power, use a voltage tester to check for residual current.
Tools Needed to Remove a Circuit Breaker
Before you start, ensure you have the following tools:
- Screwdriver
- Wire strippers
- Needle nose pliers
- Voltage tester
Step-By-Step Guide to Removing a Circuit Breaker
Here is a step-by-step guide to help you safely remove a circuit breaker from your panel box:
- Turn Off the Main Power: Switch off the main power at the electrical panel. This should cut power to all circuits in the panel box.
- Remove the Panel Cover: Using a screwdriver, remove the screws securing the panel cover, then carefully remove the cover.
- Test for Power: Use a voltage tester to ensure there's no residual current flowing in the panel box.
- Identify the Circuit Breaker: Find the circuit breaker you wish to remove. It should be in the 'off' position.
- Disconnect the Wire: Using a screwdriver, loosen the screw on the breaker that holds the wire. Then, using needle nose pliers, gently pull the wire out of the breaker.
- Remove the Breaker: Firmly grasp the breaker and pull it away from the center of the panel to release it from the clip on the bus bar. Then, pull it out of the panel.
When to Call a Professional
If you're ever uncomfortable performing this task, or if the breaker isn't easily removed, it's time to call a professional. Never force a breaker out or attempt to do something you're not comfortable with. Remember, safety always comes first!
Summary
Removing a circuit breaker from a panel box is a task that homeowners may need to undertake for several reasons, such as replacement, upgrading, or maintenance. With the right tools, precautions, and a careful step-by-step approach, it's a task that can be managed safely. However, if you're unsure or uncomfortable at any stage of the process, don't hesitate to call a professional electrician.
Remember, understanding your home's electrical system and knowing how to maintain it is crucial, but your safety should always come first. Always ensure you have turned off the main power and checked for residual current before beginning, and wear protective gear to prevent any accidents.


